Saturday, January 29, 2011

A must have book !!!


I'd Rather Be in the Studio!

I have been enjoying making my art since 2006, but there was something missing in my development as an artist. Most of my artists friends talked about this, and I finally got the courage to take a workshop about "The business of Art." 


Learning how to market myself and my art has been a confusing and scary journey, but I learned to enjoy doing it as much as I love making my art.


I am always looking to find more information about marketing and self-promotion. I am so happy to share with you this wonderful book, I'd Rather Be in the Studio!" by Alyson B. Stanfield. Alyson is a great communicator and coach in self-promotion, her book is filled with great tips and guidance.


If you are growing as an artist and your work is being accepted better and better, this is a great book you must have to learn how to self-promote your work.


These are some of her ideas in the book that I really like:


"No one is going to magically appear in your studio, wave a shimmering wand, and give you the success you want in your art career. You have to get out of the studio and make it happen." ~Alyson Stanfield


"In order to have a successful career, you should be able to define yourself and your art in a sea of artist. To do this, you must first find your style." 
~ Alyson Stanfield


Keep playing-Keep creating !!!

Love,

Thursday, January 27, 2011

Week 4....new RAW ring!


Hi everyone,
Well, here is the latest ring...and it has metal clay! WooHoo! Not big bling like those made in Barbara's class, but eye-catching no the less! (At least, I think so!) I am still having fun with the epoxy and trying to make rings that really stretch my imagination (and, hopefully, yours!). So, I thought of a way to make these epoxy cones, some of the batches worked, some didn't...needless to say, I now have a bunch of cones to work with!
I was planning on using the cones as a different way to use large CZs but the cones were too big for the CZs that I had. Since I am working within the deadlines of the RAW group, I had some time to play and still get my ring done. Originally, I was going to have the cone stand on point and set the CZ into the fat end and have a rivet going through the pointed end, but that didn't work out. My son, Morgan, actually thought outside of the box for me and laid the cone down flat on my finger and said I should make a girlie ray gun to make slow drivers get out of my way! He was just joking but it got my brain going!
I scrounged around the studio for some metal clay discs that I had made a couple of years ago and hadn't used and decided to use them like armor around the cone. I didn't have any metal clay bands so I used some sheet metal, filed and shaped, to make it. All of the parts are held together with just one big rivet!! I filed the rivet wire down a bit so it would be a tight fit and worked the long rivet into the band and up through all the discs and the cone. That was a bit tricky but I think it was worth it. I took a small head pin and doubled up the stem so it would hold the end disc in place. I drilled a small hole and placed a bit of glue (yes, I used glue!) in the hole and then set the head pin with the metal disc in place.
Well, I hope you like it. I am still playing with using other materials with the metal clay as the accents, if you are doing this too, I would love to see! Have fun in your studios, Kelly

Barbara Becker Simon Class Photos - Part Two

Here is the latest batch of gorgeous rings that came out of the Barbara Becker Simon class which was held at Ann Davis's new home classroom . Check out these beauties!
This delicious box ring was made by Sherry Chaples. This is easily the most difficult construction discussed in class...and Sherry clearly expertly tackled it.

This stunning ring was made by Cindy Miller. You can't tell from the picture but the top of the ring is actually slightly angled forward. I think this is so it is less effort to blind someone with the bling on her ring! Ha!


This beauty was made by Roxan Waluk. Roxan is so quiet in class...I was just a couple seats down from her and I look up two days later and POW! She stuns me with this amazing ring. But hold onto your seats, look at what else she did:


An expertly set marquis cut stone and look at all the wee little stones around the edge of the box! Believe me, it is "SQUEE" worthy!

Finally, here is Ann Davis's va-va-VOOM sparkly cocktail ring! Can you stand that stone?!! This ring is just amazing and it is supersized to boot so she is going to be blinding everyone she meets when she wears it.
I know there are some more pictures out there so I will post when I get another batch.
How about you? Do you like wearing lots of bling or are you more subtle in your adornment? I tend to be subtle but I do love wearing huge cocktail rings!


Sunday, January 23, 2011

Beauty is everywhere, it all depends in how we look at it !

After reading the wonderful post by Kelly Russell, "Thinking outside the box", I remembered a class I took last year with a wonderful German artist, Anemone Tontsch.
Her class was about making jewelry with perishable items. Some of my friends did not understand why I wanted to take a class like this. I feel sorry for some of them that missed taking this class because it really change me in a lot of ways.
This artist gave me a different perspective in how to see things and create my work. She is such a lover for life and our surroundings, that she sees inspiration in everything around her.
Her class was incredible, I managed to make some pieces with plantains, radishes, carrots, dry peppers, acorn and much more. At the beginning it was not easy to come out with an idea because the only thing I saw was the fruit or vegetable, it was until I broke my own limitations that the ideas started to flow and I just could not stop!! 
You can visit my post in my blog to see what I made during the class.
Beauty in Transience: Creating Perishable Jewelry with Anemone Tontsch

After the class I was so inspired that I started to make rings out of things I will never thought, like these:


I made this ring with Papaya.

 Acorns with copper wire and some coral beads.

I challenge you to play with fruits, vegetables, dry seeds, etc. You will be surprise to see how many ideas will pop up in your head. 
If you make something with perishable items, we will love to see them in our Facebook page, Metal Clay Artist Magazine. Post a picture of your master piece !! I will love to see them!

Remember, "Beauty is everywhere, it all depends in how we look at it!"

Love,

Thinking outside the box....

Kelly Russell's Ring A Week Report:

The first photo is the back of my ring and the second photo is the front with the mother of pearl discs, which I could have made with metal clay
Hi again everyone,
I wasn't going to post about my RAW this time because there was no metal clay involved, but when asked to do so, I thought I would do so with a twist. To start, I basically made this ring because I was running out of time and couldn't find the sheet metal to do the ring I wanted. (I ended up cleaning my studio, moving things around and finding forgotten little treasures, etc...). So, I had to look at what loose little bits of supplies I had to make a ring with....surprisingly, I have a lot of these little bits of experiments...
After I had sifted through my bits, I decided to go with the sheet epoxy I had played with last year when I made a "faux amber stone" with a metal clay dragonfly inside. I had poured out sheets of tinted epoxy and let them cure and then cut them out with scissors into the shapes I needed to make the top and sides of the stone. Since that experiment worked so well, I now have about a dozen different colored sheets to choose from.
Resin "Amber" with a fine silver dragonfly inside.
Anyway, I cut out a strip to fit my finger twice so I could add some rub-on curlie cues in between the layers (a on-the-spot experiment, since I had never tried it before). I then used some of those fun little nuts and bolts to secure the whole kit and kaboodle! I am thinking it would be fun to do this kind of ring with metal clay discs....or, what about different colored epoxy discs stacked with metal clay discs, tapering to a point? As a necklace or earrings? Wouldn't those be fun? Maybe epoxy discs with words embedded into the layers along with text on the metal discs? You could play off that kind of idea for months...or years....
So, the twist is this, with the cost of metal clay skyrocketing, how do you continue to incorporate it into your work without going broke? I am trying to see how to use all those mediums I have learned how to use over the years, to be able to stretch my dollars and still have a great looking piece, regardless if it is jewelry or artwork. What are you doing?
The RAW (Ring A Week) project is helping me with those experiments...gives me a small deadline, makes me focus. (My students will tell you that I get excited in class with all the possibilities and tend to go in all directions!)  By the end of the year, RAW will help me to see my development of ideas. And, of course, something new to try every week!
I hope you will try your own personal RAW or even RAM(as some of my friends are doing!) to get you to think outside the box and grow as the artist you want to become! Maybe get a local group together and meet once a month to show off what you have made and give friendly critiques, develop new ideas and new friends at the same time...how much fun is that???
Anyway, have fun....let me know what you are doing...I would love to see! And if you would like to read how I do my pieces, you can visit my blog...www.Beadfuddled.blogspot.com...and maybe leave a comment?! Have fun in your studios, Kelly


Thursday, January 20, 2011

Do you credit your art work the right way ?

I have to admit that sometimes I do not credit my art work the right way.
Even though I have learn the right way to do it, sometimes I just forget and leave some crucial information out of my images. When I said CRUCIAL information , I mean MY NAME !!
Every time you post an image in any social media place, like Facebook, your blog, your Website or Flickr; you need to add a credit line to each of your images.


This is an example of what you have to do.
LOVE BIRDS ring
© 2011 Lorena Angulo
1.5 inches by 1.20 inches
Hand sculpted and carved Bronze Clay


Why do we have to write a credit line? Well, because this is going to give your viewers more information about your piece and most of all as the title says "Credit your work" to yourself. You made the piece and are proud of it, why not give yourself the credit of your art work.

Make the habit of doing the credit line in any picture you post, believe me, it is worth it.

Now, I have to run back to my more than 200+ images and correct the ones that are missing the right credit line!

Have Fun ! Keep Playing ! Keep Creating !

Love,


Tuesday, January 18, 2011

A Wonderful Virginia Weekend with Barbara Becker Simon

Jeannette and Margaret decided at the last minute (seriously, two days before the class started!) to fly to Springfield, Virginia to take a class with Barbara Becker Simon in Ann Davis's beautiful new classroom space. It is hard to believe but Jeannette and Margaret have been working together for two years and this is the first time they have met face to face!

Margaret (left) Jeannette (right)

Barbara was teaching her box ring techniques. She kindly modeled the rings for me. I am sure you have all seen these gorgeous rings in books but...wow, the scale blew us all away. I had no idea they are so big!


Seriously, if you want a conversation piece for a cocktail party, this is the ring for you!

Ann's new classroom is in her gorgeous sunroom, below. We converted this lovely space:

Into this great classroom:

From left to right, Heidi Smith, Roxan Waluk, Karen King, Margaret, Jeannette


Barbara spent most of the first morning discussing all of the possibilities we had to choose from - as well as several ways we could take the rings in a different direction. She did many demonstrations of a variety of techniques and then set us free to work on our own projects for the rest of the day.

We are laughing in the picture below - Barbara is a very fun lady and she had us in stitches the entire weekend.

From Barbara's right, Deborah Gibson, Sherry Chaples, Ann Davis, Susan Silvy, Heidi Smith, Roxan Waluk, Margaret, Karen King, Cindy Miller

Sue is showing me she is funny too...her two rings as earrings perhaps?

Romeo, one of Ann's dogs (and perhaps studio mascot?) is checking out what we are doing, below.


The other great part of this weekend was having the opportunity to spend time with such a terrific group of women. It is rare to be in a class where everyone just gels so well - it was such a treat.

Above, Cindy Miller is demonstrating how her locket clicks shut and explaining a little trick she developed for this. From left to right, Christine Norton, Sherry Chaples, Cindy and Susan Silvey

I asked students to send me pictures of their rings in various stages of being finished. I have received the following so far and will post more as I get them. Before I move onto the eye candy, however, I just wanted to mention that Ann Davis will be hosting a class with Lorrene Davis on Sunday, February 27th. Lorrene will be teaching us her new Legend ring which is where we will be learning about channel setting stones. There are still a few openings in class - if you are interested in more details, please contact Ann directly at ann [at] anndavisstudio [dot] com.

Now....eye candy!


Deborah Gibson's beautiful pinky ring.


Susan Silvy's two sparkly cocktail rings.


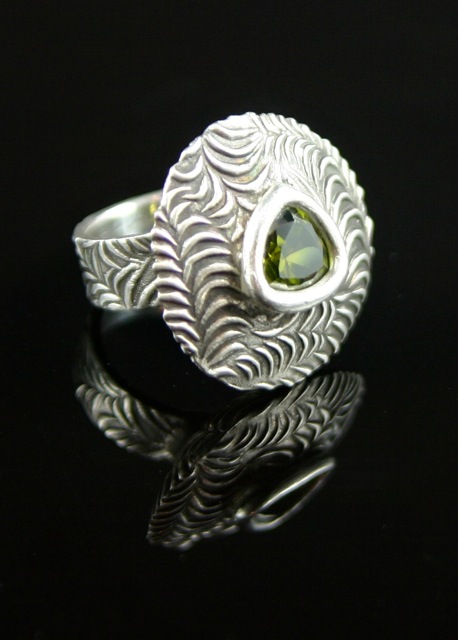
Margaret's ring is still in process but you can get a good idea of how stunning it will be when completed. I love that icy blue stone!


Another shot of Margaret's ring - this is great so you can see the scale of these rings! Margaret, I think you will blind someone with that rock!

So, how about you? Have you signed up for any classes this year? What are you looking forward to learning about?

“Metal Clay Repoussé Effects” Class with Holly Gage

Wow, what an amazing 10 days! This past weekend Jeannette, I, and an awesome group of other metal clay artists had an absolute blast at Barbara Simon's hollow box rings class at Ann Davis's fabulous new studio (stay tuned for the inside scoop from Christine Norton on this sensational class!). And the previous weekend, I was lucky enough to be part of Holly Gage's terrific Metal Clay Repoussé Effects class at her new studio. I had a fantastic time and I wanted to share my experience with all of you.

Holly Gage is an extraordinarily talented, creative and innovative jewelry artist and teacher. She’s someone whose work I’ve admired for many years and I’ve always wanted to take one of her classes. I finally got the chance when a spot opened up for her January repoussé effects class.

When creating her art, Holly finds it most satisfying to start with a unique vision seen through her personal lens (camera or eye). So, in order to transform her original photographs and drawings into metal clay jewelry, bringing her artistic vision to life through highly detailed, low relief images in fine silver, she developed a technique that simulates the dimensional relief and intricate detail of the traditional repoussé and chasing silversmithing techniques.

The metal clay jewelry Holly creates with her repoussé effects technique is absolutely stunning, and I was extremely excited about the prospect of learning her technique during this two-day class at her studio, which is located in the beautiful Pennsylvania Dutch Country area around Lancaster, Pennsylvania.

Our class participants spanned a wide range of ages and experience levels, including a talented high school student who was fairly new to metal clay and a number of very experienced metal clay artists and teachers. I really enjoyed meeting all the other students and seeing how differently each of us applied this technique.

After we introduced ourselves, Holly put us at ease by leading us in a brief relaxation exercise. Next, she inspired us with some of her own exquisite metal clay repoussé pieces. Here are a few examples:

Examples of Holly’s “metal clay repoussé effects” pieces.

Next, Holly took us through an overview of the process behind making one of her repoussé effects pieces called “Blossoms for Dinner,” which was based on a photograph of some squash blossoms that had been grown by her husband, Chris, a talented chef who prepared our delicious gourmet lunches.

“Blossoms for Dinner” “metal clay repoussé effects” pendant. Photo courtesy of Holly Gage.

We were shown the photo and the black-and-white photocopy (reduced to slightly larger than the desired finished to allow for the metal clay shrinkage) and the resulting polymer clay mold, which had been created by transferring the image to a thick slab of soft, uncured Sculpey® SuperFlex Bake & Bend™ clay and then pressing, sculpting and manipulating the clay gently and patiently with needle tools, ball-end styluses and other tools to create the basic shapes and relief before curing the mold in a toaster oven. The image was simplified for the mold and only selected details from the photo were pressed into the polymer clay. The fine details were added later directly on the molded metal clay. Seeing how the process evolved from the original, full-sized photo through to the highly detailed, finished pendant provided a very helpful frame of reference prior to starting work on our own pieces.

Holly also explained some of the basic principles of good design, including the importance of choosing primary and secondary focal points, drawing the viewer’s eyes to those focal points, and creating compositions with a good balance of positive and negative space. She showed us how to frame the best shot in our images (similar to the way film directors frame the best shot for each scene in a movie).

Then it was time for us to start creating our molds! First we burnished our images (either the reduced-size photocopies or, for more complex images, simplified pencil tracings onto our polymer clay slabs. Some of us found it quite challenging to control the tool impressions on the very soft, uncured Bake & Bend polymer clay. I’m used to carving hard, cured Premo! Sculpey® polymer clay with micro carving tools, which gives you a much greater degree of precise control. Fortunately, with Holly’s help and guidance, I got the hang of it eventually. The effects that can be achieved by working the very soft, uncured Bake & Bend cannot be achieved by carving cured, rigid polymer clay. The Bake & Bend formula also remains flexible after curing, so that removing metal clay from the mold is much easier than removing it from a rigid, cured polymer mold.

After we created and cured our molds, we each rolled out a sheet of PMC3™ and pressed it into our molds, slowly and systematically, making sure we got a clear impression before unmolding the metal clay. Since the molds are just intended to rough in the design and create the appropriate levels of surface relief, the designs molded into the metal clay are really more of a blank canvas for the detail work. Holly warned us in advance that before they are refined, all metal clay pieces go through what she calls an “ugly stage.” She explained that with this technique, that stage occurs immediately after the metal clay is removed from the mold. Fortunately, that’s also when the real fun starts: adding the details that make the somewhat bland, low-relief images come alive!

The technique at a glance: Roxan Waluk’s flower pendant with scrolling vines

From the pencil tracing...

...to the polymer mold...


...to the detailing of the molded metal clay greenware...


...to the fired and finished piece with patina.

Holly showed us a wide range of texturing options, some to be worked on the fresh clay and others to be used on bone dry clay. She also gave us great tips for making the focal points pop, such as attaching separate, dimensional elements and how creating subtle undercuts to give the illusion of greater relief and dimensionality.

Linda Stauffer refining her dry metal clay sunflower with butterfly.
It’s hard to believe this was her first time working with either polymer or metal clay!


During the second of the scrumptious gourmet lunches that Chris prepared for us, we had a roundtable discussion and critique of the pieces. Each of us had the opportunity to ask for and receive constructive input and suggestions from our fellow students about specific aspects of our pieces, such as ideas for bails that would both enhance and also become integral parts of our designs.

Chef Chris looks on as BB Batt-Behar, Pat Enriques and Monique Perry enjoy his salmon quiche and salad.

Day Two lunchtime critique. Holly and we offered feedback and ideas for our works-in-progress.

Additional photos of our lunchtime critique session by Monique Perry.
We all chose images with different degrees of intricacy, and worked at our own pace. There was no pressure to reach a particular stage of the process by a certain time, which was great. It made the participants much more relaxed, and allowed each of us to delve into as much detail as we wished. Periodically, we would stop to watch Holly explain and demonstrate some of her professional secrets for smoothing the surface of the metal clay greenware to prepare it for a mirror finish, removing unwanted marks, refining uneven areas and making lines and edges crisp and clean.

Christy Miller and Linda Stauffer add details to their molded PMC3 greenware.

As students, we were more interested in using this opportunity to learn and perfect the techniques Holly was teaching us than in finishing our pieces by the end of the class, so we all chose to keep working at our own pace and watching Holly’s technique demonstrations and to complete our class pieces after returning home. Holly made all us promise to share pictures of our repoussé effects pieces as soon as we finished ours. Here are some of the other photos she’s received so far:

BB Behar’s enameled dragonfly with a titanium body.


Monique Perry’s cardinal on a pine branch.


Pat Henriques’ cuddling cats.


Christy Miller's parrot (she plans to add color).


Melanie Melius’ old encrusted Chattanooga pier.


Signe Lalish’s fern unfolding pendant.

This was an extremely talented, creative, focused and fun group of artists, and I hope to be able to share more of the finished pieces with you in a future post.

Before we wrapped up, Holly demonstrated how she uses a rotary tool with silicone polishing attachments to remove any imperfections on her metal clay prongs and on sterling silver castings of her original handcrafted metal clay designs.

Holly is a terrific, focused, patient and generous teacher as well as an incredibly talented and innovative artist. She’s a rare gem and I look forward to studying with her again in the future. I also recommend taking this class with her if you get the chance. Here's her class schedule: http://www.hollygage.com/pages/classes.html. This overview of the process sounds fairly simple, but trust me: Learning the specific techniques and tips that Holly shared with us and demonstrated close-up during the class is what allowed us to take our pieces from the rough “ugly stage” to highly detailed, professionally finished pieces, and to bring our two-dimensional art to life as dramatic and evocative three-dimensional silver jewelry crafted that is uniquely ours. Thanks again for such a fabulous experience, Holly!

P.S. If you’re wondering what happened to my piece, it ended up being about belt buckle size! So I’m in the process of making a smaller version.

~ Margaret
Related Posts Plugin for WordPress, Blogger...